Hardware Requirements

Server

The system requirements for the server are minimal - the application is not heavy on resources.

Operating System Windows 7 or newer
(including Windows Server flavours)
Memory Suggest following Microsoft’s recommendations:
Windows 7 - 6GB
Windows 10 - 8GB
Database PostgreSQL installed on the server, requiring no addition resources.
File Sharing ON The folder containing the OD Office Pro server needs to be shared, to facilitate software updates.
This share will ONLY be used for updates.
Firewall DISABLED As this is a client/server application, there can be no firewall between the client and the server.
With a firewall in place, any TCP/IP messages from the client will be blocked.
Client

The hardware requirements for each client are similar, in that the recommendations made by Microsoft based on the OS are more than sufficient.

Operating System Windows 7 or newer
(including Windows Server flavours)
Memory Suggest following Microsoft’s recommendations:
Windows 7 - 6GB
Windows 10 - 8GB
Number Of Clients Unlimited.
The purchase price if for the server - you can run any number of clients within the office as required.
Other Applications
Adobe PDF Viewer Allows the user to open (read only) any PDF document.
Printer PDF Driver Allows OD Office Pro to print directly to a PDF document. The driver (like any printer driver) needs to be installed on each client.
One we commonly use:
Cute PDF

Return To Top of Page

Backups

Overview

There are two important concepts to consider, when keeping your data safe:
1.Understanding how OD Office Pro helps with backups, and critical files.
2.Planning on what to do with those backups and critical files in the case of a disaster.

How OD Office Pro helps with backups

OD Office Pro can be configured to take regular backups of the database, and place these backups in a place you specify. Any attachments you add to a patient are not part of this backup, so the attachments folder has to be backed up manually.

Database

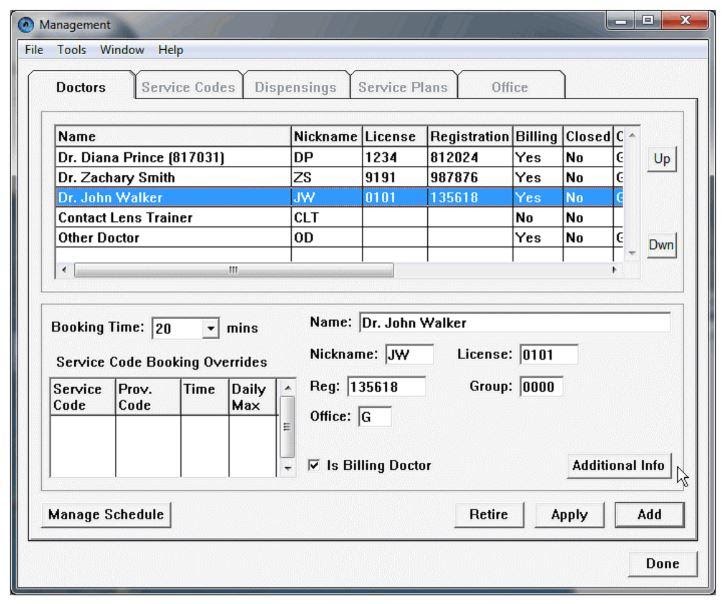
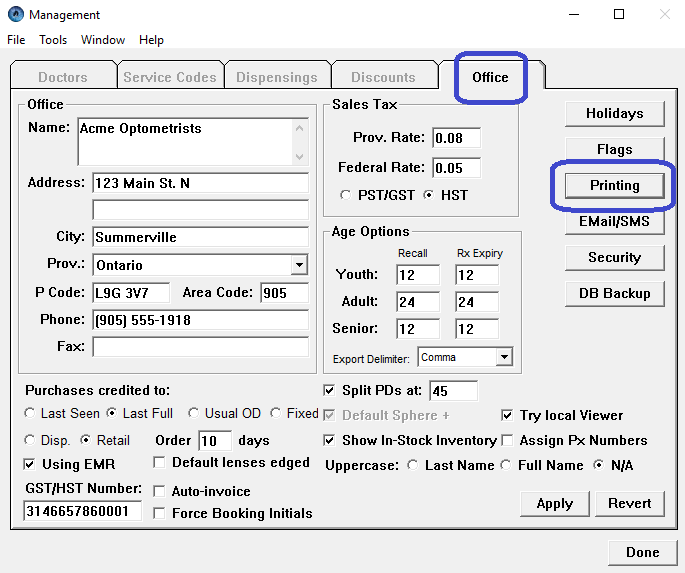
You can check the location of your database backup file by going to Management, turning to the Office page, then clicking on DB Backup.

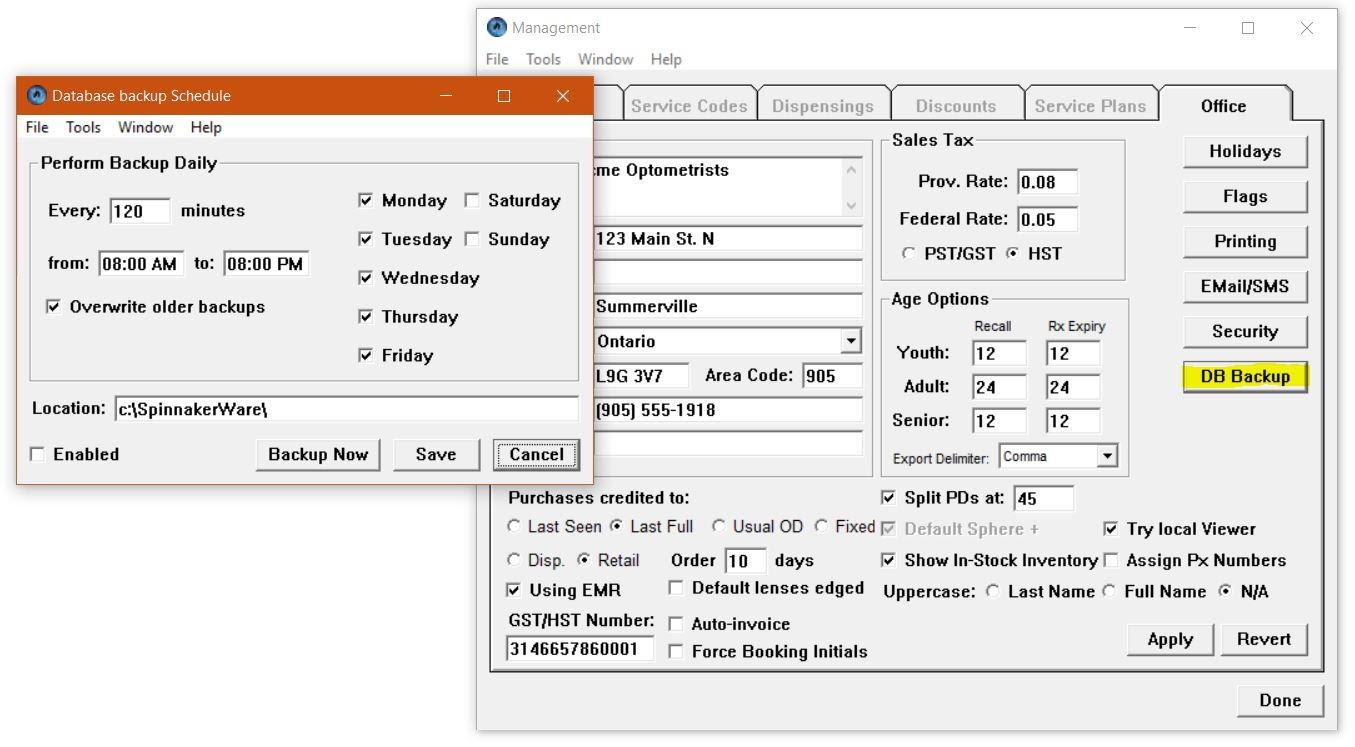
This will show you the configuration for generating that file.
How often
Which days
Where the file is written

CAUTION - It is a bad idea for the backup to be made on the same drive as OD Office Pro is installed. If that drive were to fail, you’d lose both the original database and any backups that were made.

Commonly, the backups are placed onto a removable hard drive.
With the drive attached, create a folder where you want the backups to go.
In the “Database Backup Schedule” window shown above, tell OD Office Pro about this directory.
Ensure that the ‘Enabled” checkbox is clicked.
Save these changes.
Test the process, by clicking “Backup Now”.

Attachments

Attachments are stored in a very specific directory on the server, and it is this entire directory that needs to be backed up and stored safely away:
c:\SpinnakerWare\ODOfficePro Server\Images.
If you are attaching photos/scans to patient records, you MUST backup this folder.

What your office needs to do

Both the database backups and the attachments folder need to be copied somewhere safe.
Ideally, the backups should be secure, preferably offsite. That way, if anything bad should happen to the server or (worse) the office in general, you’ve got files that can be used to restore your office to a good state.

One Possible Solution

Standard OD Office Pro Server Installation

The database is in its standard configuration, and exists on the same drive OD Office Pro Server is installed on, in C:\SpinnakerWare.
The attachments are functioning, and are stored in C:\SpinnakerWare\ODOfficePro Server\Images.

Target - Removable Drive

A removable drive is commonly used, which can be detached and kept safe (fireproof safe) or taken off site as a means of disaster-recovery.

Backup Database

Using OD Office Pro Client, go the the ‘Management’ area from the Launchpad.
Go to the ‘Office’ tab, and click the ‘DB Backup’ button.
Ensure backups are ENABLED.
Ensure the LOCATION exists.
It is safest to back up to a different drive than the database itself lives on. In this case, set the location to ‘D:\ODOProBKUP\’.
Click the ‘Backup Now’ button, and go look for the file that was just created. Ensure that it can be found, and has a timestamp that matches when the backup was taken.
Make sure all of these changes have been saved.

Backup Attachments

OD Office Pro Server creates a folder for, and otherwise manages, all attachments, but taking a copy of this for backup purposes it outside of OD Office Pro’s area of responsibility. However, there exists many free and open programs that can help with backing up this folder.

Use any program that you wish, and configure it so that a copy is made and placed in the same folder as the backup of the database was made, ‘D:\ODOProBKUP\’.

Single Folder containing the Critical Files

Now we have a single directory, ‘D:\ODOProBKUP\’, that contains the most critical files you’ll need to rebuild your practice, from an EMR perspective.

Cloud

You could set up a cloud-based copy, so that any changes made to the files in the ‘D:\ODOProBKUP\’ drive are replicated up into the cloud.

Return To Top of Page

Adding a Signature Image

Overview

A signature image can be capture, and then automatically added to prescription printouts.

To begin, first download and print out ‘signatureSheet.pdf’, available in the Support section of the website.

Next, write your signature on the sheet, making sure to remain completely within the black box. It is recommended that a dark pen, or even a fine-point sharpie be used, to ensure that the signature is dark enough.

Once the sheet has been signed, it must be scanned, using your scanner, to provide a JPEG image. You may have to adjust the setting on your scanner to have it output a JPEG.

Signature images are part of each doctor’s profile, so to import a signature image, go to the Management section of ODOfficePro, and make sure the Doctors page is showing.

Select the appropriate doctor, and then press the ‘Additional Info’ button.

Now click the ‘Signature Image’ button. If this is the first time a signature has been added for this doctor, then a prompt will appear, indicating that there is currently no image on file.

Click ‘Yes’ to import the signature.

A File Selection prompter will appear, requesting that the scan file be selected. Make sure to select the JPEG file created by your scanner.

A new window will now appear, showing a portion of the scanned page, with a blue box superimposed over top.

Use the + and - buttons to zoom out or in, and use the mouse, holding down the left mouse button, to move the scanned image around, until the signature is completely contained within the blue box.

Ideally, the signature should occupy as much of the blue box as possible, with none of the surrounding black box.

It is not always possible to exclude the black box, but that can be dealt with at the next stage.

Once the desired position and size of the signature image has been attained, click th ‘Grab’ button to capture the image within the blue box. A preview of the selection will be displayed.

The left and right mouse buttons can now be used to edit the image, including erasure (right-click) of unwanted marks.

When satisfied with the signature image, pressing the ‘Save’ button will save the image to the doctor's profile.

At any point in the future, returning to the Additional Doctor Information window for a doctor, the ‘Signature Image’ button can be used to edit the signature, or to delete it, to allow a new scan to be imported.

When a signature image has been created for a doctor, it will automatically appear on the signature line of Spectacles and Contacts prescription printouts.

Return To Top of Page

E-Mail Accounts

Adding e-mail capabilities to OD Office Pro is as simple as providing the e-mail account information.

E-Mail

From the Dashboard choose the MANAGEMENT button.
-Click the OFFICE tab and choose Email/SMS button on the right side
-Fill in your email information in the ‘Outgoing EMail’ section.

Return To Top of Page

Add-Ons to ODO Office Pro

Barcode Scanners

There are no recommendations for Barcode Scanners. Any scanner you can get, will work the same way...just get one you like, that has the right price. Since they all work exactly the same way, there is nothing that is better or worse.

Cloud Backups

While OD Office Pro do not provide backup services, the files that are generated in the backups we create can easily be saved off-site using cloud based services. We are huge fans of cloud-based file backups (like Dropbox, or Sync.com) for the ease-of-use and robustness.

Using Sync.com

This is the link for Sync.com.

We like it because they automatically encrypt all uploaded data, and they are located in Toronto, so the data falls completely within Canadian borders, as per Ministry requirements. And their pricing is good.

They offer a small free service (5 Gigs), and this will be perfectly fine for offices that do not use image attachments...the database will NEVER require anywhere near this amount of memory.

For offices using attachments (which require more storage) Sync.com offers a "Personal Pro" package for $49 per year, which provides 500 Gigs. They have bigger options, but I cannot imagine any office needing more than that.

Their system works similar to Dropbox, and other cloud backup systems. Their software will create a folder on the computer. Anything that is placed into that folder, will then be automatically synced to their servers.

With the ODOfficePro database, we set it up so that the backup file gets written into their folder...which then takes the backup file, and immediately copies it out to their servers, giving the office a secure offsite backup, without any intervention required by the staff.

If you are interested, we will ask them to sign up for an account. Software and installation is by Sync.com They provide documentation and help with this. Once they are ready, they contact us, and I set up their ODOfficePro software to store the database backup file, as well as all of their attachments, into that Sync.com folder.

Lab Interface

DVI's RxWizard

To use DVI's RxWizard, it must first be installed on one or more of the office's computers. We do not provide instructions as we are not involved in that process.

Once this is installed, it is automatically available to be used, as long as the Lab has been configured.

If you have already setup DVI's RxWizard software, then enter the webid where it says "ID". Nothing needs to be entered in the catalog section, as that will fill in automatically, when the catalog is updated.

As offices are creating Spectacle Orders, they can and should be reviewing these from the Orders window (press the Orders button on the main window).

If they have an order that is going to Zeiss (ie. one of the Zeiss labs was selected when the order was created), then they simply need to right-click on that order, and select Submit to Lab. This will launch RxWizard, and populate the prescription, and frame details.

Please note: the lens will need to be selected manually...this is due to the lens naming convention in the RxWizard program, and there does not appear to be anything we can do to get around this.

PDF Printer Drivers

CutePDF Writer - A free PDF writer

Once installed, you will see an additional ‘printer’ that can be used within OD Office Pro.

Texting Interface

For texting, you can choose to…
Send reminders from the Call List
Send a direct text message to a patient from the Tools menu of the patient screen

The texting configuration is simple to add, and can be found in the Management section of the Launchpad. Click on the ‘Office’ tab, and then the ‘EMail/SMS’ button. To add SMS capabilities we need to specify the provider and their account information.

Currently, we have configured only one provider, based in Barrie. Please contact them to sign up for an account that will allow for texting from within OD Office Pro.

Swift SMS Gateway Inc.

Swift SMS Gateway
65 Cedar Pointe Drive, Suite 225
Barrie, Ontario
L4N 9R3
Toll Free: 1-800-264-7141

There are options to add a variety of services.
https://www.swiftsmsgateway.com/services

To set up Texting go to Dashboard then pick MANAGEMENT button.
-Click the OFFICE tab and choose Email/SMS button on right side.
-Choose Swift SMS Gateway as the provider.
-Enter the Account provided to you.

Return To Top of Page

Adding a Logo to your Invoices

Prepare the Logo

Ensure the logo is the correct size and rename it to “invoiceLogo.jpg”
Copy the logo file into the client program folder (by default, c:\SpinnakerWare\ODOfficePro Client) of each computer that will print logos.

Adding the Logo

Adding a logo to your invoices is part of the ‘Printing Preferences’ are of the Management section. From the Launchpad, select ‘Management’, and then go to the ‘Office’ tab. Within the Office tab, you’ll see a ‘Printing’ button.

Adding the logo to your invoice, once it’s been copied into each of the computers as described above, is as simple as selecting ‘Left’ in this section.

Press ‘Continue’ on the Printing Preferences page, and then ‘Apply’ on the Office Management page.

NOTE: These changes will be picked up by each OD Office Pro Client, the next time they’re restarted. To refresh a client to pick up these changes, without restarting, is as simple as clicking the ‘Refresh Office’ menu item in the Tools menu of the Launchpad.

Return To Top of Page

Contact

Mailing Address
Spinnakerware Inc.
12 Drury Crt.
Ancaster, ON
L9G 3V7

Toll-free
1-855-470-2556
Monday-Friday   9AM-6PM

Support support@spinnakerware
.com

E-Mail info@spinnakerware.com